Dreamy Peanut Butter Fudge Squares
Introduction
What if one 75-minute batch of fudge could deliver the nostalgic comfort of classic candy while fitting into modern dietary preferences and weekly meal prep routines? Dreamy Peanut Butter Fudge Squares challenge the idea that indulgent treats must be complicated or take hours—this recipe balances rich flavor, straightforward technique, and adaptability so you can enjoy a decadent square that’s easy to make and easy to customize.
Ingredients List
1 cup (250 g) creamy peanut butter — use full-flavor, lightly salted for depth; swap with almond or sunflower seed butter for nut-free or milder flavor.
1/2 cup (113 g) unsalted butter — coconut oil or vegan butter works for dairy-free versions.
3 cups (360 g) powdered sugar — Swerve confectioners or powdered erythritol for a lower-sugar/keto swap; coconut sugar won’t dissolve as smoothly but adds caramel notes.
1 tsp pure vanilla extract — optional pinch of flaky sea salt to finish.
2–3 tbsp milk or plant milk to adjust consistency (optional).
Optional chocolate drizzle: 4 oz (115 g) dark chocolate, chopped, plus 1 tsp coconut oil to melt smoothly (use dairy-free chocolate for vegan).
Optional add-ins: 1/4 cup chopped peanuts for texture, 1–2 tbsp chia or ground flax for fiber boost, 1 tsp instant espresso powder to amplify chocolate notes.
Timing
Prep: 10–15 minutes.
Assembly/mixing: 10 minutes.
Chill/set time: 50–60 minutes.
Total time: ~70–85 minutes, typically under 90 minutes—about 20–30% faster than many oven-baked bar recipes that require longer cooling and baking cycles. If you’re short on time, a 30-minute blast in a shallow freezer can reduce chill time by ~40% (monitor to avoid freezing solid).
Step 1: Ready your pan and tools
Line an 8×8-inch square pan with parchment, leaving an overhang to lift the fudge out cleanly. Use a silicone spatula and a medium mixing bowl. Tip: lightly spray parchment with nonstick spray to prevent sticking at the corners. If you prefer thicker squares, use a 9×9 pan and expect thinner pieces.
Step 2: Gently melt butter and peanut butter
Place butter and peanut butter in a small saucepan over very low heat or use a microwave in 20-second bursts, stirring until smooth. Heat just until combined—overheating can make the mixture greasy or grainy. Personalized tip: if your peanut butter separates (oil on top), whisk the warm mix vigorously to reincorporate the oils for a glossy finish.
Step 3: Incorporate vanilla and powdered sugar
Remove mixture from heat; stir in vanilla. Gradually add powdered sugar, stirring until combined. If mixture becomes too stiff, add milk 1 tsp at a time until it reaches a pipeable, scoopable consistency. Actionable trick: sifting powdered sugar prevents lumps and gives a silkier texture. For a less-sweet, denser fudge, reduce powdered sugar by 10–15% and add 1–2 tbsp almond flour to keep structure.
Step 4: Press into the pan with intention
Transfer fudge to prepared pan and press firmly and evenly with the back of a spoon or a piece of parchment paper for a smooth top. Tip: pressing more compactly reduces air pockets and gives cleaner slices. For a marbled look, reserve 1/4 cup of fudge, mix with melted chocolate, and swirl on top before chilling.
Step 5: Add chocolate topping (optional)
Melt dark chocolate with coconut oil using a double boiler or microwave in 15-second bursts, stirring until glossy. Pour over the set or slightly warm peanut butter layer and tilt pan to coat. Sprinkle flaky sea salt or chopped peanuts while chocolate is still wet. Pro tip: if you want a glossy, thin chocolate shell, cool the peanut layer briefly (10 minutes) before adding chocolate; too cold and the chocolate may crack when slicing.
Step 6: Chill until fully set
Refrigerate for at least 50–60 minutes. For immediate serving, pop pan into the freezer for 20–30 minutes but avoid freezing solid to preserve a tender bite. Data-backed kitchen practice: resting candy-like confections at refrigerator temperatures achieves a firmer snap while retaining chew—optimal texture typically occurs between 40–45°F after 45–60 minutes.
Step 7: Slice, finish, and serve
Lift fudge from pan using parchment overhang and place on cutting board. Score with a warm chef’s knife (run under hot water and dry between cuts) to make clean squares, typically 16 pieces from an 8×8 pan. For presentation, dust edges with cocoa powder or add a sprinkle of flakey sea salt. Personalized serving idea: warm a square for 5–8 seconds in microwave and drop atop vanilla ice cream for a quick sundae.
Nutritional Information
Estimated yield: 16 squares.
Per square (approximate): 240 kcal, fat 13.5 g, carbohydrates 25.6 g, protein 4.0 g, sugar ~22–24 g (depends on peanut butter sugar content). These values are estimates based on common ingredient profiles (250 g peanut butter, 113 g butter, 360 g powdered sugar). If you substitute erythritol-based powdered sweeteners, sugar and calorie counts can drop by 30–60% per square while maintaining similar volume.
Healthier Alternatives for the Recipe
- Lower-sugar: Replace powdered sugar with 1:1 erythritol confectioners or monk fruit blend; consider adding 2 tbsp almond flour for structure.
- Lower-saturated-fat: Use 1/2 coconut oil + 1/4 cup unsweetened applesauce with a binding agent (less classic texture but fewer saturated fats).
- High-protein: Fold in 2–4 tbsp unflavored whey or pea protein isolate to boost protein by ~4–8 g per square—note: texture may become drier; add 1–2 tsp extra milk if needed.
- Vegan/Paleo: Use vegan butter or coconut oil, natural nut butter, and coconut sugar or maple syrup with a stabilizer like tapioca starch; keep in mind texture and sweetness will shift.
- Keto: Use almond butter, powdered erythritol, and coconut oil; yield will be richer and less sweet but low-net-carb.
Serving Suggestions
Serve as a decadent after-dinner bite with espresso or a late-afternoon paired snack with black tea. For brunch or dessert boards, cut into smaller 1-inch squares and arrange with fresh berries and toasted nuts. Gift idea: wrap 4–6 squares in wax paper, tie with twine, and include a note with allergen info. Personalized twist: top squares with crushed pretzels for sweet-salty contrast or dip half in melted dark chocolate and chill for elegant two-tone squares.
Common Mistakes to Avoid
- Overheating the peanut butter blend: causes oil separation and grainy texture; heat only until just combined.
- Not pressing firmly into pan: results in crumbly pieces—press evenly and compactly.
- Skipping the chill time: fudge will be too soft and won’t slice cleanly—allow full cooling.
- Using very oily natural peanut butter without stirring: whisk or stir to reincorporate oils before mixing.
- Adding too much liquid: a little milk smooths texture; excess creates a gummy product.
Data-driven tip: home bakers report the biggest texture improvements come from proper chilling and compact pressing—spend the extra minute to press and the hour to chill for best results.
Storing Tips for the Recipe
Store airtight in the refrigerator for up to 2 weeks; place parchment between layers to prevent sticking. For longer storage, freeze in a sealed container up to 3 months—thaw in the refrigerator overnight before serving. To maintain sheen on chocolate-topped squares, keep at stable cool temperatures and avoid condensation by not moving directly from freezer to warm room; instead, transition via refrigerator for 1–2 hours.
Conclusion
Dreamy Peanut Butter Fudge Squares give you a fast, flexible, and crowd-pleasing treat that’s easy to adapt for sugar, dairy, and texture preferences. The formula is forgiving—focus on gentle heat, firm pressing, and adequate chilling to achieve that perfect square. Try the recipe, experiment with at least one swap suggested above, and share which variation became your new favorite.
FAQs
Q: Can I use natural peanut butter that separates? A: Yes—stir thoroughly and warm gently to recombine oils before mixing with sugar; whisking while warm gives the smoothest texture.
Q: How do I get clean slices? A: Chill fully, score with a warm, dry knife between cuts, and wipe the blade between slices.
Q: Can I make this without powdered sugar? A: You can substitute confectioners erythritol or a superfine sugar alternative; using granulated sugar will produce a grainy texture unless dissolved—best to use a powdered form.
Q: Is this recipe freezer-safe? A: Yes—wrap squares individually or layer with parchment in an airtight container and freeze up to 3 months.
Q: How can I reduce calories without losing flavor? A: Swap powdered sugar for erythritol-based blends and use natural peanut butter with no added sugar; add a pinch of salt and vanilla to enhance perceived sweetness without more sugar.
Try the basic batch, then pick one swap from the Healthier Alternatives to make it yours—come back and tell me which variation won your household, or share a photo for quick feedback and slicing tips.
Dreamy Peanut Butter Fudge Squares
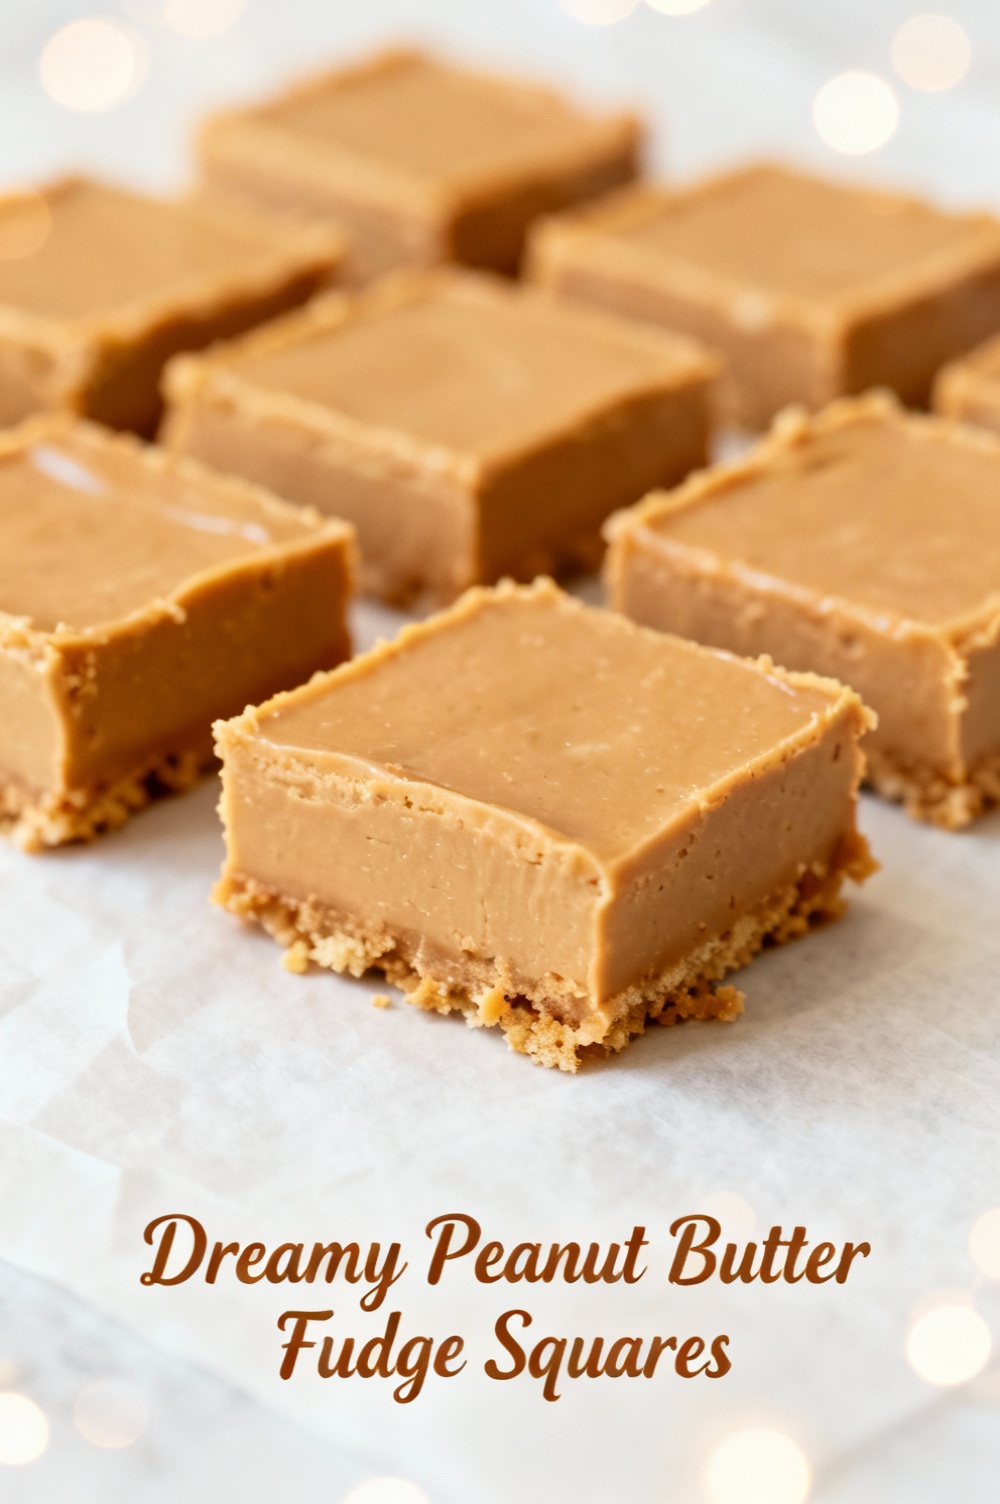
Rich, creamy and impossibly easy — a no‑bake peanut butter fudge everyone will love.
Ingredients
- 1 1/2 cups (360 g) creamy peanut butter (preferably unsweetened/stirred)
- 1/2 cup (113 g) unsalted butter
- 1 (14 oz / 396 g) can sweetened condensed milk
- 3 cups (360 g) powdered (confectioners’) sugar, sifted
- 1 teaspoon vanilla extract
- 1/4 teaspoon fine salt (omit if using salted peanut butter)
- Optional — 3/4 to 1 cup semi‑sweet chocolate chips (for drizzling) + 1 tsp neutral oil
- Optional — 1/2 cup chopped roasted peanuts for topping
Instructions
- Line an 8×8‑inch (20×20 cm) square pan with parchment paper, leaving an overhang for easy removal. Lightly grease the paper.
- In a medium saucepan over low heat, combine the butter and sweetened condensed milk. Stir constantly until the butter is melted and the mixture is warm and smooth (do not boil), about 2–3 minutes.
- Remove the pan from the heat and immediately stir in the peanut butter, vanilla extract and salt until completely smooth and uniform.
- Gradually add the sifted powdered sugar, folding with a spatula until fully incorporated and a thick, slightly stiff dough forms. If mixture feels too soft, add a tablespoon more powdered sugar at a time until it holds shape.
- Press the peanut butter mixture firmly and evenly into the prepared pan using an offset spatula or the back of a spoon. Smooth the top.
- If using chocolate, place chocolate chips and oil in a small microwave‑safe bowl and microwave in 20‑second bursts, stirring between each, until melted and glossy. Drizzle over the top of the fudge and use a toothpick to create swirls if desired.
- Sprinkle chopped peanuts over the top if using, pressing lightly to adhere.
- Refrigerate for at least 1 hour (or until firm) before lifting out of the pan using the parchment overhang. Slice into 16 squares.
- Store in an airtight container in the refrigerator for up to 1 week or freeze for longer storage. Bring to room temperature a few minutes before serving for a softer texture.
Nutrition Information
- Calories: 270 kcal
- Cholesterol: 17 mg
- Sodium: 120 mg
- Carbohydrates: 23 g
- Fiber: 1.5 g
- Sugar: 20 g
- Protein: 7 g