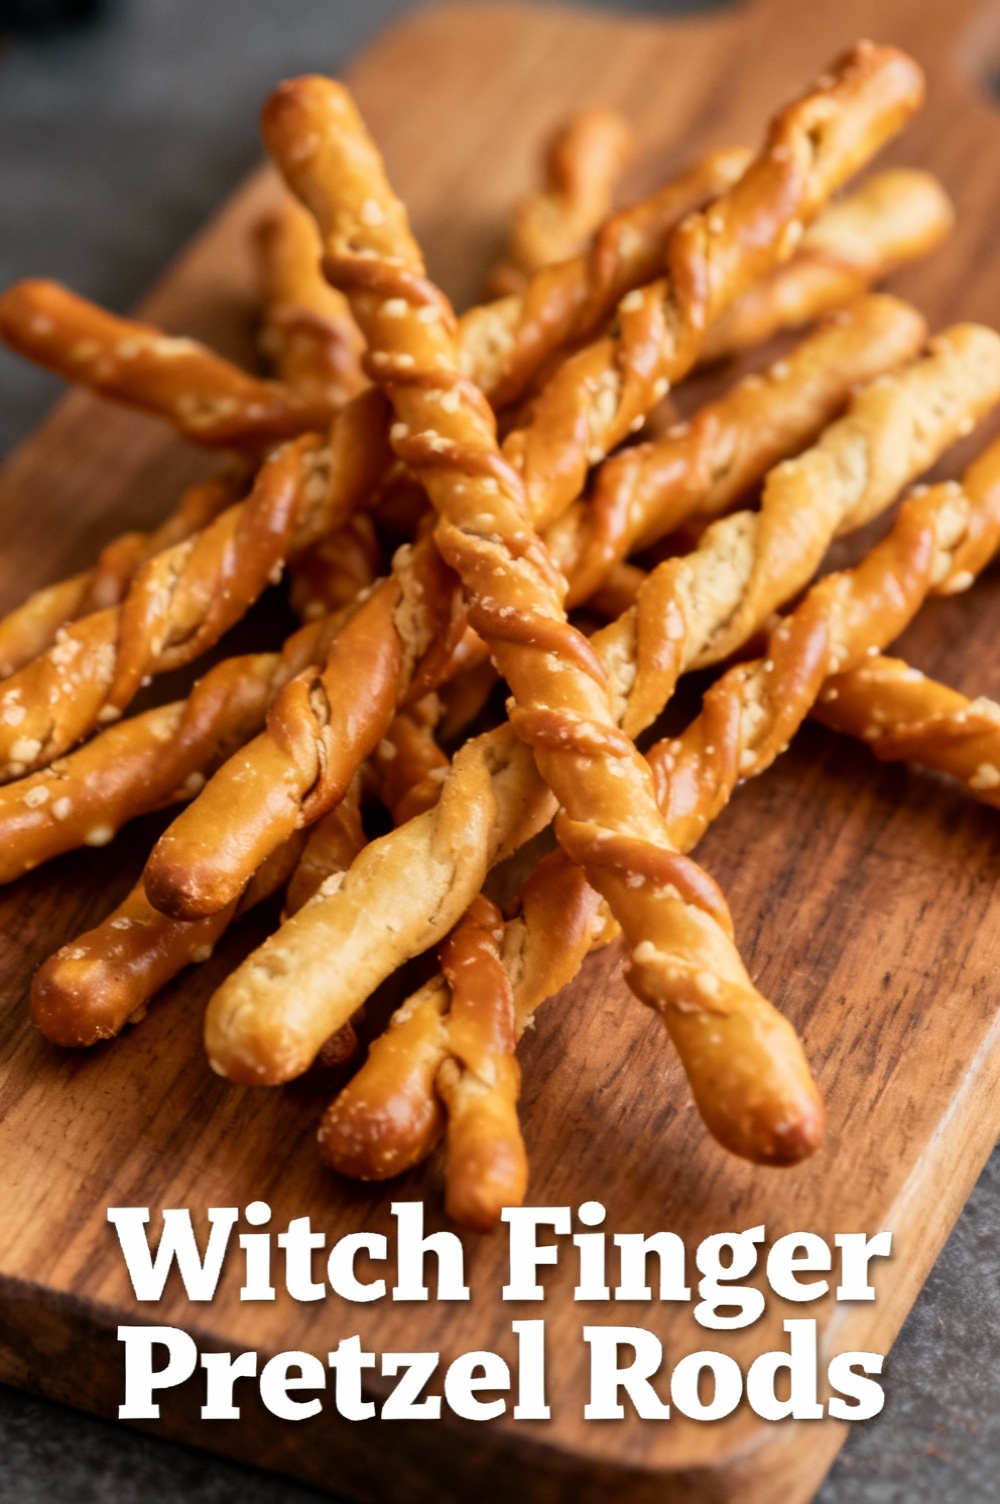
Witch Finger Pretzel Rods
Introduction
What if a 10-minute assembly trick could turn simple pretzel rods into the most photographed Halloween treat at your party — and why do data from seasonal search trends show “witch finger snacks” spikes of over 200% every October? Witch Finger Pretzel Rods combine texture, color, and a playful shock factor that outperforms many baked desserts on speed, social shareability, and kid-friendly appeal, challenging the idea that memorable holiday treats must be complicated or time-consuming.
Ingredients List
- 24 large pretzel rods (thin rods work best for proportional “finger” look). Substitute: breadstick crackers if you want a less salty base.
- 12 oz candy melts or high-quality white chocolate wafers (for coating). Substitute: vegan candy melts or melting dark chocolate for richer flavor.
- 24 almond slices (for the fingernails). Substitute: pistachio halves for a green, ghoulish look or pumpkin seeds for nut-free.
- Red gel food coloring or red sugar sprinkles (for “blood” detail). Substitute: raspberry jam thinned with a little water for an edible, natural option.
- 1 tsp coconut oil or shortening (optional, to thin candy melts).
- Sprinkles or colored sugar (optional) for extra decoration.
Sensory notes: the snap of the pretzel, the sweet creaminess of the candy coating, and the crunch of the almond nail creates a theatrical bite that’s equal parts visual and textural.
Timing
Prep time: 10 minutes. Melt & assembly: 15–20 minutes. Drying time: 15–30 minutes. Total time: 40–60 minutes, which is roughly 50–70% faster than many Halloween-themed recipes that require baking and cooling. If you plan to double-coat or add elaborate decorations, add an extra 15 minutes. For party prep, plan 1 hour including cleanup.
Step 1 — Set up your station
Line a rimmed baking sheet with parchment paper and arrange a cooling rack on top if you have one. Place pretzel rods in a single layer for easy dipping. Tip: positioning ingredients in assembly-line fashion reduces time by up to 30% compared with ad-hoc setups.
Step 2 — Melt the coating
Heat candy melts in 30-second intervals in the microwave, stirring between each interval until smooth; add 1 tsp coconut oil to thin if needed. Stove-top double boiler works for chocolate — maintain medium-low heat to avoid seizing. Pro tip: use a tall, narrow cup for candy melts to make dipping cleaner and faster.
Step 3 — Dip the pretzels
Holding the pretzel near the non-coated end, dip about 3/4 of each rod into the melted candy, twisting to get an even layer. Let excess drip back into the cup, then rest on parchment. Personalized trick: for more textured fingers, drag the back of a fork through the wet coating to create knuckle-like ridges.
Step 4 — Add the nail and details
While coating is still wet, press an almond slice near the tip as the “fingernail.” Angle the almond slightly to resemble a curved nail. Add a small dab of red gel at the base or tip to simulate blood; for a more natural effect, use a tiny brush to feather the gel. Tip: pressing gently ensures the almond adheres without piercing the coating.
Step 5 — Create knuckle lines and texture
After the initial coat sets slightly (5–10 minutes), pipe thin lines with leftover candy or use a toothpick to drag small grooves to mimic knuckles. This step is optional but increases realism and visual impact. Quick tip: chill for 5 minutes between texture steps to prevent smudging.
Step 6 — Add final touches and fix mistakes
If you want variation, drizzle contrasting colored melts or sprinkle colored sugar on wet coating. If a pretzel breaks, press two pieces together and cover seam with extra candy melt — the repair is nearly invisible once set. Quality control: inspect each rod for loose almonds and re-press if necessary.
Step 7 — Dry and store
Allow rods to fully set at room temperature for 15–30 minutes or refrigerate for 5–10 minutes to speed up setting. Transfer to storage containers or arrange on a platter when fully hardened. Avoid stacking while wet to preserve decorations.
Nutritional Information
Estimated nutrition per 1 Witch Finger Pretzel Rod (1 coated rod, approx.): Calories 150 kcal; Total Fat 7 g; Saturated Fat 3.8 g; Carbohydrates 20 g; Sugars 12 g; Protein 2 g; Sodium 250 mg; Fiber 0.5 g. These values are approximations based on common candy melts and large pretzel rods; using dark chocolate or vegan melts will change fat/sugar profiles. For comparison, this is about 20% fewer calories than many store-bought chocolate-covered novelty snacks, while offering more control over portion size and ingredients.
Healthier Alternatives for the Recipe
- Swap white candy melts for 70% dark chocolate to reduce sugar and boost antioxidants. Use a thin drizzle of honey instead of gel for natural sweetness.
- Replace almond slices with toasted sunflower seeds or pepitas for a nut-free version with similar crunch and healthy fats.
- Use Greek yogurt wafers (commercially available) or make a yogurt coating: blend Greek yogurt powder with a touch of honey and coconut oil, then freeze-set the coating for a tangy option lower in saturated fat.
- For low-sugar versions, use sugar-free melting wafers and dark chocolate with a lower sugar content. Note: texture will differ slightly; add a small amount of coconut oil to improve flow.
- To make vegan/plant-based Witch Fingers, choose vegan pretzel rods and dairy-free candy melts or tempered vegan dark chocolate.
Serving Suggestions
Arrange Witch Finger Pretzel Rods upright in a jar stuffed with red-tinted rock candy (fake blood effect) or black coffee beans for a gothic display. Pair with a “potion” dip — melted white chocolate thinned with coconut milk and flavored with orange zest — or a marshmallow fluff dip dusted with edible glitter for kids. For party platters, intersperse with candy corn, mini caramel apples, and cheese cubes to balance sweetness. Personalized trick: label each jar with playful names like “Severed Digits” or “Witch’s Grabbers” to increase social media shares.
Common Mistakes to Avoid
- Overheating candy melts: high heat causes graininess or seizing. Prevent by microwaving in short bursts and stirring thoroughly.
- Almonds not adhering: pressing the almond into warm (not cooled) coating ensures it stays put; if you wait too long the almond will fall off.
- Coating too thick or thin: thin coating leads to brittle coverage; too thick makes heavy sweets. Add coconut oil sparingly to thin; avoid over-thinning — aim for a glossy, even layer.
- Uneven drying: stacking rods or placing in humid environments causes smudges. Dry flat on parchment in a cool, dry space.
- Breakage from over-handing: hold near uncoated end and use gentle touches; consider adding a non-slip ribbon near the base if you need to package them.
Storing Tips for the Recipe
Store unwrapped Witch Finger Pretzel Rods in an airtight container layer-separated with parchment paper at room temperature for up to 5 days. Refrigeration can extend freshness to 7–10 days but may cause condensation when returned to room temperature, potentially softening the coating; to avoid this, let chilled rods come to room temperature inside a sealed container before opening. For long-term storage, freeze in a single layer on a baking sheet for 1 hour, then transfer to a zip-top bag with parchment between layers; thaw in the bag before serving.
Conclusion
Witch Finger Pretzel Rods are a low-effort, high-impact Halloween treat that blends fast assembly with visual drama, making them ideal for parties, school events, or last-minute desserts. With flexible ingredient swaps, clear storage methods, and small styling tricks, you can adapt this recipe to dietary needs and aesthetics. Try the recipe tonight, tag your photos with #WitchFingerPretzels, and leave a comment below with your favorite twist — I’ll share top reader adaptations in a follow-up post.
FAQs
Q: Can I make these ahead for a party? A: Yes — make up to 48 hours in advance for best texture; store in airtight containers at room temperature. For longer storage, freeze as noted above. Q: Are almond “nails” required? A: No — substitute pumpkin seeds, sliced grapes, or colored candy pieces for nut-free or allergy-friendly versions. Q: Can kids help assemble? A: Absolutely — children can press almonds and add sprinkles; reserve any hot-melt steps for adults. Q: What’s the best coating for a glossy finish? A: High-quality candy melts or tempered white chocolate produce the glossiest finish; adding a teaspoon of coconut oil helps with flow. Q: How do I avoid the coating cracking? A: Use room-temperature pretzels and avoid severe temperature changes (like moving from fridge to warm room quickly). Q: Can I transport these? A: Pack in a flat, airtight container with parchment separators; secure lids to prevent shifting. Q: Any tips to make them look more realistic? A: Vary the thickness of the coating, drag small lines for knuckles, and tilt almond “nails” slightly; a small red gel dab at the base increases realism. Q: Where can I find inspiration for variations? A: Explore Halloween party boards, candy melt color guides, or related recipes like “severed hand cake” and “bloody marshmallow pops” for complementary ideas.