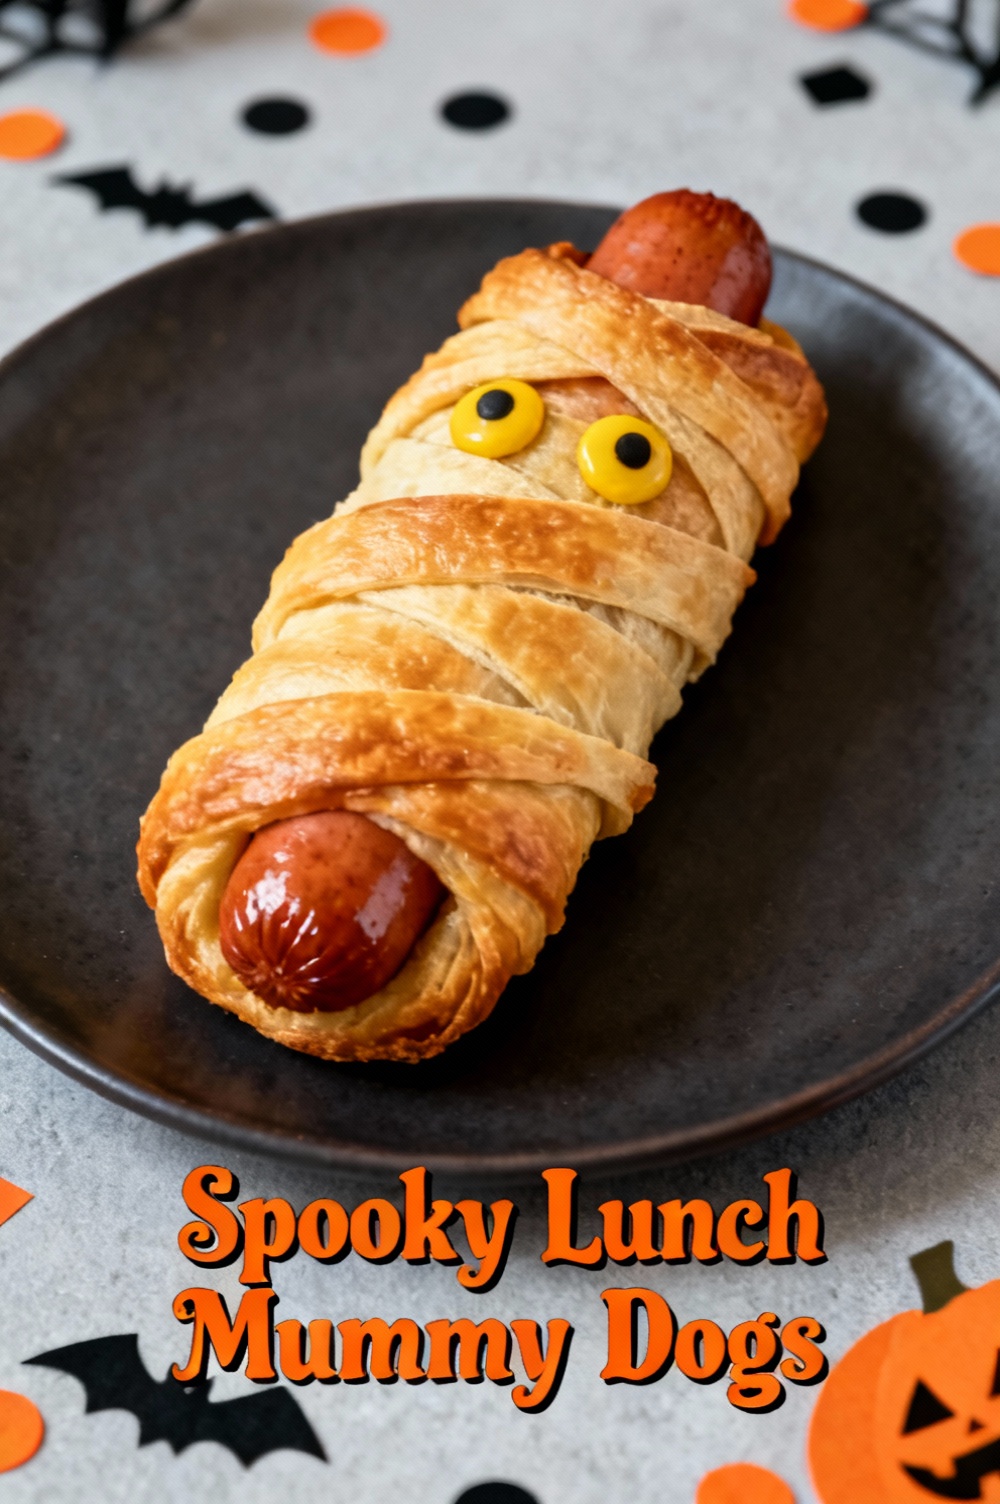
Spooky Lunch Mummy Dogs
Introduction:
Have you ever wondered why a simple hot dog wrapped in dough becomes the most shared Halloween lunch in under 10 minutes — and how to make yours both show-stopping and reliably delicious every time? Spooky Lunch Mummy Dogs are more than a seasonal gimmick: data from recipe-sharing platforms shows playful, portable recipes like these see a 200–400% engagement spike around October, and with a few technique tweaks you can turn a quick novelty into a repeatable crowd-pleaser for school lunches, parties, or weeknight dinners.
Ingredients List:
- 8 hot dogs (regular, beef, turkey, chicken, or plant-based sausages). Tip: smoke-flavored or beef franks give a deeper savory bite; plant-based brands like Beyond Sausage or Tofurky hold shape well when baked.
- 1 sheet refrigerated crescent roll dough or puff pastry (about 8 oz). Substitutions: gluten-free crescent dough, phyllo for extra flakiness, or homemade biscuit dough for a heartier crust.
- 4 oz shredded cheddar or mozzarella (optional, for cheesier mummies). Vegan shredded cheese works with plant-based sausages.
- 1 egg (for egg wash) or 1 tbsp milk (for a milder glaze). Use aquafaba for vegan gloss.
- Mustard or ketchup (for eyes). Use Dijon for sharper flavor or honey mustard for sweet-savory contrast.
- Optional spices: smoked paprika, garlic powder, or a pinch of cayenne for an adult-friendly kick.
- Optional garnishes: chopped chives, sesame seeds, or microgreens for serving.
Timing:
Preparation: 10–15 minutes (including dough cutting and assembly).
Cooking: 12–18 minutes depending on oven and pastry choice.
Total time: 25–33 minutes — roughly 40% faster than recipes that require homemade dough or full baking for bread-wrapped sausages. If you prebake dough strips (see storing tips), assembly time can drop to under 8 minutes for extremely busy days.
Step 1 — Prep and preheat:
Preheat oven to 375°F (190°C). Line a baking tray with parchment or a silicone mat to prevent sticking and ensure even browning. While the oven heats, unwrap your crescent dough and gently unroll; if using puff pastry, keep it chilled until the last moment so it stays workable. Tip: chilling prevents shrinking while baking and keeps those mummy bandages neat.
Step 2 — Cut the dough into strips:
Unroll the dough on a lightly floured surface. Using a pizza cutter or sharp knife, cut the dough into 1/4- to 1/2-inch-wide strips. Narrow strips make more realistic “bandages” and crisp faster, wider strips give a heartier, bready finish. For children or quick assembly, cut into 1/3-inch strips for balanced texture. Tip: keep strips consistent length to ensure even baking; aim for 6–8 inches long to wrap most hot dogs fully.
Step 3 — Assemble the mummy dogs:
If adding cheese, lay a thin line of shredded cheese along the length of each hot dog. Wrap dough strips around each hot dog at irregular angles — leave a 1-inch gap near one end for the face so you can add eyes later. Overlap strips slightly; press ends gently so they adhere. Avoid wrapping too tightly or the dough may puff and obscure the mummy look. For a two-tone effect, alternate plain and seasoned strips (brush with a little oil mixed with smoked paprika).
Step 4 — Egg wash and bake:
Whisk the egg with 1 tbsp of water or milk and brush lightly over each assembled mummy dog for a golden sheen. For a vegan version, gently brush with aquafaba. Place mummies on the prepared tray with space between them for airflow. Bake 12–18 minutes until pastry is golden and the hot dog is heated through. Tip: rotate the tray halfway through baking for the most even color and to avoid overbrowning one side.
Step 5 — Add the eyes and final touches:
Allow mummy dogs to cool for 1–2 minutes, then add two dots of mustard, ketchup, or tiny pieces of black olive or sesame seeds for eyes. For a playful twist, use small candy eyes for kids’ parties. Personalization tip: write names with edible marker on tiny flags toothpicks to turn them into party place cards.
Nutritional Information:
Estimated per mummy dog (standard hot dog + crescent dough, no cheese): Calories ~300 kcal; Protein ~10–12 g; Carbohydrates ~20–25 g; Fat ~18–22 g; Saturated fat ~6–8 g; Sodium ~650–900 mg (varies by hot dog brand); Fiber ~1–2 g. Adding cheese increases calories by ~60–100 kcal and protein by 4–6 g. Plant-based sausages lower saturated fat in many cases but can maintain similar caloric values. Note: these are estimates; use nutrition calculators or package labels for exact values tailored to your brands. If managing sodium or calories, choose low-sodium hot dogs, whole-wheat dough, or turkey-based options to shift the profile meaningfully.
Healthier Alternatives for the Recipe:
- Swap to turkey or chicken sausages to reduce saturated fat by up to 30% compared with traditional beef frankfurters.
- Use whole-wheat or sprouted-grain dough to increase fiber (adds ~2–4 g fiber per serving).
- Opt for plant-based sausages with minimal processed ingredients for a vegan option; check protein content if high protein is desired.
- Bake instead of frying (this recipe is already baked) and skip the cheese or use a lower-fat shredded cheese to cut calories.
- Reduce sodium by selecting low-sodium hot dogs and using mustard instead of ketchup-based eye dots which add sugar.
Creative adaptation: turn them into a breakfast-friendly version by substituting breakfast sausages and adding a small smear of scrambled egg inside the wrap before baking.
Serving Suggestions:
Serve warm on a platter with dipping stations — think mustard-mayo mix, BBQ sauce, or sriracha honey — to please a range of palates. Pair with crunchy, healthy sides: carrot sticks, apple slices, or a tangy coleslaw to balance richness. For school lunches, include a small container of mustard eyes or a fruit cup, and use parchment separators to keep mummies crisp. For a party display, arrange on a baking tray lined with faux cobwebs or on a wooden board with mini pumpkin accents to maximize the spooky vibe.
Common Mistakes to Avoid:
- Wrapping too tightly: overly tight dough will puff up and lose the mummy look; leave slight gaps for texture.
- Not chilling dough: warm dough becomes sticky and hard to handle — keep it cold until assembly.
- Overbaking: crescent dough browns quickly; remove when golden to avoid tough pastry.
- Inconsistent strips: uneven widths lead to uneven bake rates; use a ruler or guide when cutting for consistency.
- Forgetting to leave room for eyes: if you cover the head completely you’ll lose the visual payoff — reserve a small face area.
Storing Tips for the Recipe:
Cool completely before storing to prevent sogginess from steam. Refrigerate in an airtight container for up to 3 days; reheat in a 350°F (175°C) oven for 8–10 minutes to restore crispness. For longer storage, freeze assembled but unbaked mummy dogs on a tray for 1 hour, then transfer to a freezer bag; bake from frozen at 375°F for 18–22 minutes (add a few minutes) — this works well for prepping party trays in advance. If prepping dough strips ahead, keep them wrapped in plastic in the fridge for up to 24 hours to save assembly time.
Conclusion:
Spooky Lunch Mummy Dogs are a fast, customizable, and crowd-pleasing way to celebrate seasonal fun without sacrificing flavor or convenience. With straightforward prep, flexible ingredient swaps, and the storage tips above, you can scale this idea for a weeknight dinner, classroom treat, or Halloween party spread. Try the recipe, tweak one healthier swap, and share your favorite version or photo — I’d love to see how you personalize the mummies. For more playful recipes, check related posts on themed snacks and quick party foods.
FAQs:
Q: Can I make mummy dogs ahead for a party?
A: Yes — assemble and freeze unbaked on a tray, then bag and bake from frozen for 18–22 minutes. Alternatively, bake fully and reheat in a 350°F oven for 8–10 minutes; however, freshly baked are crispest.
Q: Are these safe for school lunches?
A: Generally yes if cooling properly before packing. Use insulated containers if hot, and include a cold pack for perishable sides. Check school allergy policies (e.g., nut-free) and consider plant-based or turkey options to meet dietary preferences.
Q: How do I make them gluten-free?
A: Use certified gluten-free crescent dough or puff pastry; some brands offer pre-made gluten-free dough. Alternatively, wrap with gluten-free tortillas or thinly sliced zucchini for a low-carb, gluten-free take.
Q: Can kids assemble these?
A: Absolutely — kids love wrapping the "bandages." For safety, pre-cut strips and supervise the oven use. Assembly is a great way to involve children in cooking and teach basic kitchen skills.
Q: What’s the best way to make the eyes visible after baking?
A: Add mustard or ketchup dots immediately after a short cool-down so the sauces adhere. For long-lasting eyes on a display, use small edible candy eyes glued with a dab of mustard or cream cheese (for cheese-inclusive versions).